Using Fusesoc and Led To Believe To Blink a Digilent CMod A7 15t
I describe how to use FuseSoC to build a blinky hello world design deployed on a Digilent CMod A7 15t using a Windows machine. This seemed like it should have been fairly easy, but alas, not so…
Background
After scouring the Internet to find any FPGA development board available for sale, I came up with the Digilent CMod A7 15t. This board is based on the Xilinx Artic A7; the only one available was the 15t variant (with 10K LUTs vs. the more common 35t with 20K LUTs). After installing the Xilinx Vivado development platform, I set out to follow the requisite Hello World tutorial to make sure I have everything installed and to obtain a rudimentary understanding of the tools. I am not an FPGA developer…
After many hours waiting for the multi-GB download and install of the Vivado development environment (what could possible be in the software to make it so big?), it did eventually install on my Windows 10 laptop. The Hello World tutorial proceeded without much difficulty, although the article was written for the 2018 Vivado version and I had installed the 2020 version. There were minor differences, but they were not worth mentioning.
After going through the dizzing array of options presented by the Vivado development tool, I longed for a simple VS Code-esk development experience. After all, I have been experimenting with the open source GHDL simulator, which is a very straightforward tool for elaborating and simulating VHDL and will do synthesis for some platforms. Write some VHDL, assemble some GHDL commands in a batch or make file, execute said file to run your simulation. Easy.
But when it come to synthesis…
It seems that the state of open source for Xilinx synthesis is not nearly as far along as the Lattice universe. With the simplest of FPGA design, there should be one hdl file and one or two constraint files, and then some command line driven mechanism to synthesize and load the design into a target. Now, Vivado provides a TCL-based command interface shell, but yikes, it is not as easy as it should be to get to a bin file.
FuseSoC
It turns out that the FuseSoC is something akin to Gradle and Maven (for those Java developers amongst you out there), but for hardware designs. A very nice feature of FuseSoC is that it abstracts away the various backend toolsets with a unified Core API implemented via a YAML-based package file definition. It then implements runners directed by a combination of target, tool, and package to yield the expected result, be it a simulation to execute or a bit/bin file to load. You design your “core” and/or mix it in with already existing cores (remote and/or local dependencies can be specified); FuseSoC figures out the dependencies, flattens the design, and performs the actions based on a target and tool that you specify. Easy…well, sort of.
Installing and Running
Conveniently, the FuseSoC creator supports a package repository called LED to Believe which aims to provide a blinky package/target for each FPGA board in existance. It’s a nod to the novice, and I really appreciate it.
Since FuseSoC is based on Python, I thought support under Windows would not be a problem. My first clue should have been the documentation with a placeholder to describe how to install under Windows. I plowed ahead anyway…
After doing…
pip install fusesoc
fusesoc library add fusesoc_cores https://github.com/fusesoc/fusesoc-cores
And then…
c:\Users\chuck>fusesoc run --target=cmod_a7 fusesoc:utils:blinky
I got…
←[1;37mINFO: Preparing fusesoc:utils:blinky:1.1←[0m
←[1;37mINFO: Setting up project←[0m

←[1;37mINFO: Building←[0m
←[1;31mERROR: Failed to build fusesoc:utils:blinky:1.1 : Command 'make' not found. Make sure it is in $PATH←[0m
c:\Users\chuck>
Ugh. Ok, so FuseSoC relies on make. Not great but not the end of the world. One can install Cygwin or use Wsl, which I use quite frequently. Over to Wsl…
Next error…
chuck@CCBX1:~$ fusesoc run --target=cmod_a7 fusesoc:utils:blinky
INFO: Preparing fusesoc:utils:blinky:1.1
INFO: Setting up project

INFO: Building
vivado -notrace -mode batch -source fusesoc_utils_blinky_1.1.tcl
/bin/bash: vivado: command not found
make: *** [Makefile:17: fusesoc_utils_blinky_1.1.xpr] Error 127
ERROR: Failed to build fusesoc:utils:blinky:1.1 : '['make']' exited with an error: 2
FuseSoC is looking for Vivado. I noticed it was not in my path. No problem…
export PATH=$PATH:/mnt/c/Xilinx/Vivado/2020.2/bin
And again, and next error…
chuck@CCBX1:~$ fusesoc run --target=cmod_a7 fusesoc:utils:blinky
INFO: Preparing fusesoc:utils:blinky:1.1
INFO: Setting up project

INFO: Building
vivado -notrace -mode batch -source fusesoc_utils_blinky_1.1.tcl
WARNING: /mnt/c/Xilinx/Vivado/2020.2/tps/lnx64/jre11.0.2 does not exist.
ERROR: Could not find 64-bit executable.
ERROR: /mnt/c/Xilinx/Vivado/2020.2/bin/unwrapped/lnx64.o/vivado does not exist
make: *** [Makefile:17: fusesoc_utils_blinky_1.1.xpr] Error 1
ERROR: Failed to build fusesoc:utils:blinky:1.1 : '['make']' exited with an error: 2
So Vivado knows that it is running on Linux and is now looking for a Java Runtime Environment, which for Linux does not exist at Vivado’s expected location. Further, it appears to be looking for binaries at a location for Linux that do not exist (as my Vivado installation was done under Windows). It should be the case that Windows binaries should start under Wsl, but the Vivado startup does not know this, I suppose.
Now, I could re-install Vivado under Wsl, but the articles I read either require you to install it GUI-less or install a Windows X Server. Both these routes seemed like more trouble and perhaps frought with their own rabbit holes…never mind.
VirtualBox
Avoiding more heartache, I bit the bullet and installed VirtualBox with a Lubuntu 21.04 guest. I allocated 4 cpus, 4 GB main RAM, 32MB video RAM, and a bridged network. The guest image already came allocated with 500GB of expandable disk, which is enough for yet another install of the bloated Vivado.
After Vivado installation, there are three additional installs I had to do to get Vivado to play nice on the Linux guest:
- In the guest, install the cable drivers. Note: My location was different than mentioned in the link (/home/osboxes/tools/Xilinx/Vivado/2020.2/data/xicom/cable_drivers/lin64/install_script/install_drivers)
- In the guest, install a missing dependency
sudo apt install libtinfo5 - In the host, install a USB 3.0 driver (for those boards that require it - the CMod A7 does not, but I use the 3.0 driver, as by default the use of the 1.1 driver caused sporadic board disconnects)
Installing and Running thorugh VirtualBox Lubuntu
First, plug in the board. Then make sure to capture the Digilent Adept USB Device in the host configuration.
Now one more time…
fusesoc run --target=cmod_a7 fusesoc:utils:blinky
A bunch of output…all seemingly good synthesis, place and route, and bin file generation. Then…
FuseSoC Xilinx FPGA Programming Tool
====================================

INFO: Programming part xc7a35tcpg236-1 with bitstream fusesoc_utils_blinky_1.1.bit
INFO: [Labtools 27-2285] Connecting to hw_server url TCP:localhost:3121
INFO: [Labtools 27-2222] Launching hw_server...
INFO: [Labtools 27-2221] Launch Output:

****** Xilinx hw_server v2020.2
  **** Build date : Nov 18 2020 at 09:50:49
    ** Copyright 1986-2020 Xilinx, Inc. All Rights Reserved.


INFO: [Labtools 27-3415] Connecting to cs_server url TCP:localhost:3042
INFO: [Labtools 27-3417] Launching cs_server...
INFO: [Labtools 27-2221] Launch Output:


******** Xilinx cs_server v2020.2
  ****** Build date   : Nov 03 2020-13:02:56
    **** Build number : 2020.2.1604437376
      ** Copyright 2017-2020 Xilinx, Inc. All Rights Reserved.


INFO: Trying to use hardware target localhost:3121/xilinx_tcf/Digilent/210328B254B4A
INFO: [Labtoolstcl 44-466] Opening hw_target localhost:3121/xilinx_tcf/Digilent/210328B254B4A
INFO: Opened hardware target localhost:3121/xilinx_tcf/Digilent/210328B254B4A on try 1.
INFO: Part not found as part of localhost:3121/xilinx_tcf/Digilent/210328B254B4A. Trying next device.
INFO: [Labtoolstcl 44-464] Closing hw_target localhost:3121/xilinx_tcf/Digilent/210328B254B4A
ERROR: None of the hardware targets included a xc7a35tcpg236-1 FPGA part.  Check cables and ensure that jumpers are correct for JTAG programming.
make: *** [Makefile:23: pgm] Error 1
ERROR: Failed to run fusesoc:utils:blinky:1.1 : '['make', 'pgm']' exited with an error: 2
The tool can’t program the board. I initially thought that the guest might not be able to see the USB JTAG device on the board. Using these instructions I confirmed that the guest could see the board.
What to do? Well, upon reading the error message more carefully, this bit stands out: None of the hardware targets included a xc7a35tcpg236-1 FPGA part. True that. I have a 15t, not a 35t.
So how do I change that?
This gets into the good part of learning some more about FuseSoC. The --target=cmod_a7 switch determines which target will be used based on the fusesoc:utils:blinky package definition. The part definition for the cmod_a7 is as follows:
  cmod_a7:
    default_tool : vivado
    description : Digilent Cmod A7
    filesets : [rtl, cmod_a7]
    parameters : [clk_freq_hz=12000000]
    tools:
      vivado:
        part : xc7a35tcpg236-1
    toplevel : blinky
Clearly there is a part number for the 15t that is not xc7a35tcpg236-1. My assumption is that I could copy the package locally, rename cmod_a7 to cmod_a7_35t, and create a cmod_a7_15t definition with the correct part number (which will probably be done by the time you read this). But is there a way to override the part from the command line?
Turns out, there is…add -h to the end of the command. While documented, it did not occur to me right away that this is what this did…
fusesoc run --target=cmod_a7 fusesoc:utils:blinky -h

INFO: Preparing fusesoc:utils:blinky:1.1
usage: fusesoc run fusesoc_utils_blinky_1.1 [-h] [--clk_freq_hz CLK_FREQ_HZ] [--vivado-settings VIVADO_SETTINGS] [--part PART] [--synth SYNTH]
                                            [--pnr PNR] [--jobs JOBS] [--jtag_freq JTAG_FREQ] [--source_mgmt_mode SOURCE_MGMT_MODE]
                                            [--hw_target HW_TARGET]

optional arguments:
  -h, --help            show this help message and exit

Verilog parameters (Compile-time option):
  --clk_freq_hz CLK_FREQ_HZ
                        Clock frequency in Hz

Backend arguments:
  --vivado-settings VIVADO_SETTINGS
                        Path to vivado settings (e.g. /opt/Xilinx/Vivado/2017.2/settings64.sh)
  --part PART           FPGA part number (e.g. xc7a35tcsg324-1)
  --synth SYNTH         Synthesis tool. Allowed values are vivado (default) and yosys.
  --pnr PNR             P&R tool. Allowed values are vivado (default) and none (to just run synthesis)
  --jobs JOBS           Number of jobs. Useful for parallelizing OOC (Out Of Context) syntheses.
  --jtag_freq JTAG_FREQ
                        The frequency for jtag communication
  --source_mgmt_mode SOURCE_MGMT_MODE
                        Source managment mode. Allowed values are None (unmanaged, default), DisplayOnly (automatically update sources) and All
                        (automatically update sources and compile order)
  --hw_target HW_TARGET
                        Board identifier (e.g. */xilinx_tcf/Digilent/123456789123A
This is a very nice tool!
Now the question is…what is the part number for the 15t and how do I find that out? I noodled around a bit to see if this part number/identifier could be enumerated from the JTAG bus. One can get a part id, which is a series of bits that mean something, but not a string as far as I can tell. I really want to know where it comes from. Is it a made up thing within the context of Vivado? Is it burned into the silicon? End of the day…I don’t know.
So what I did do is look at the Digilent datasheet for the board:
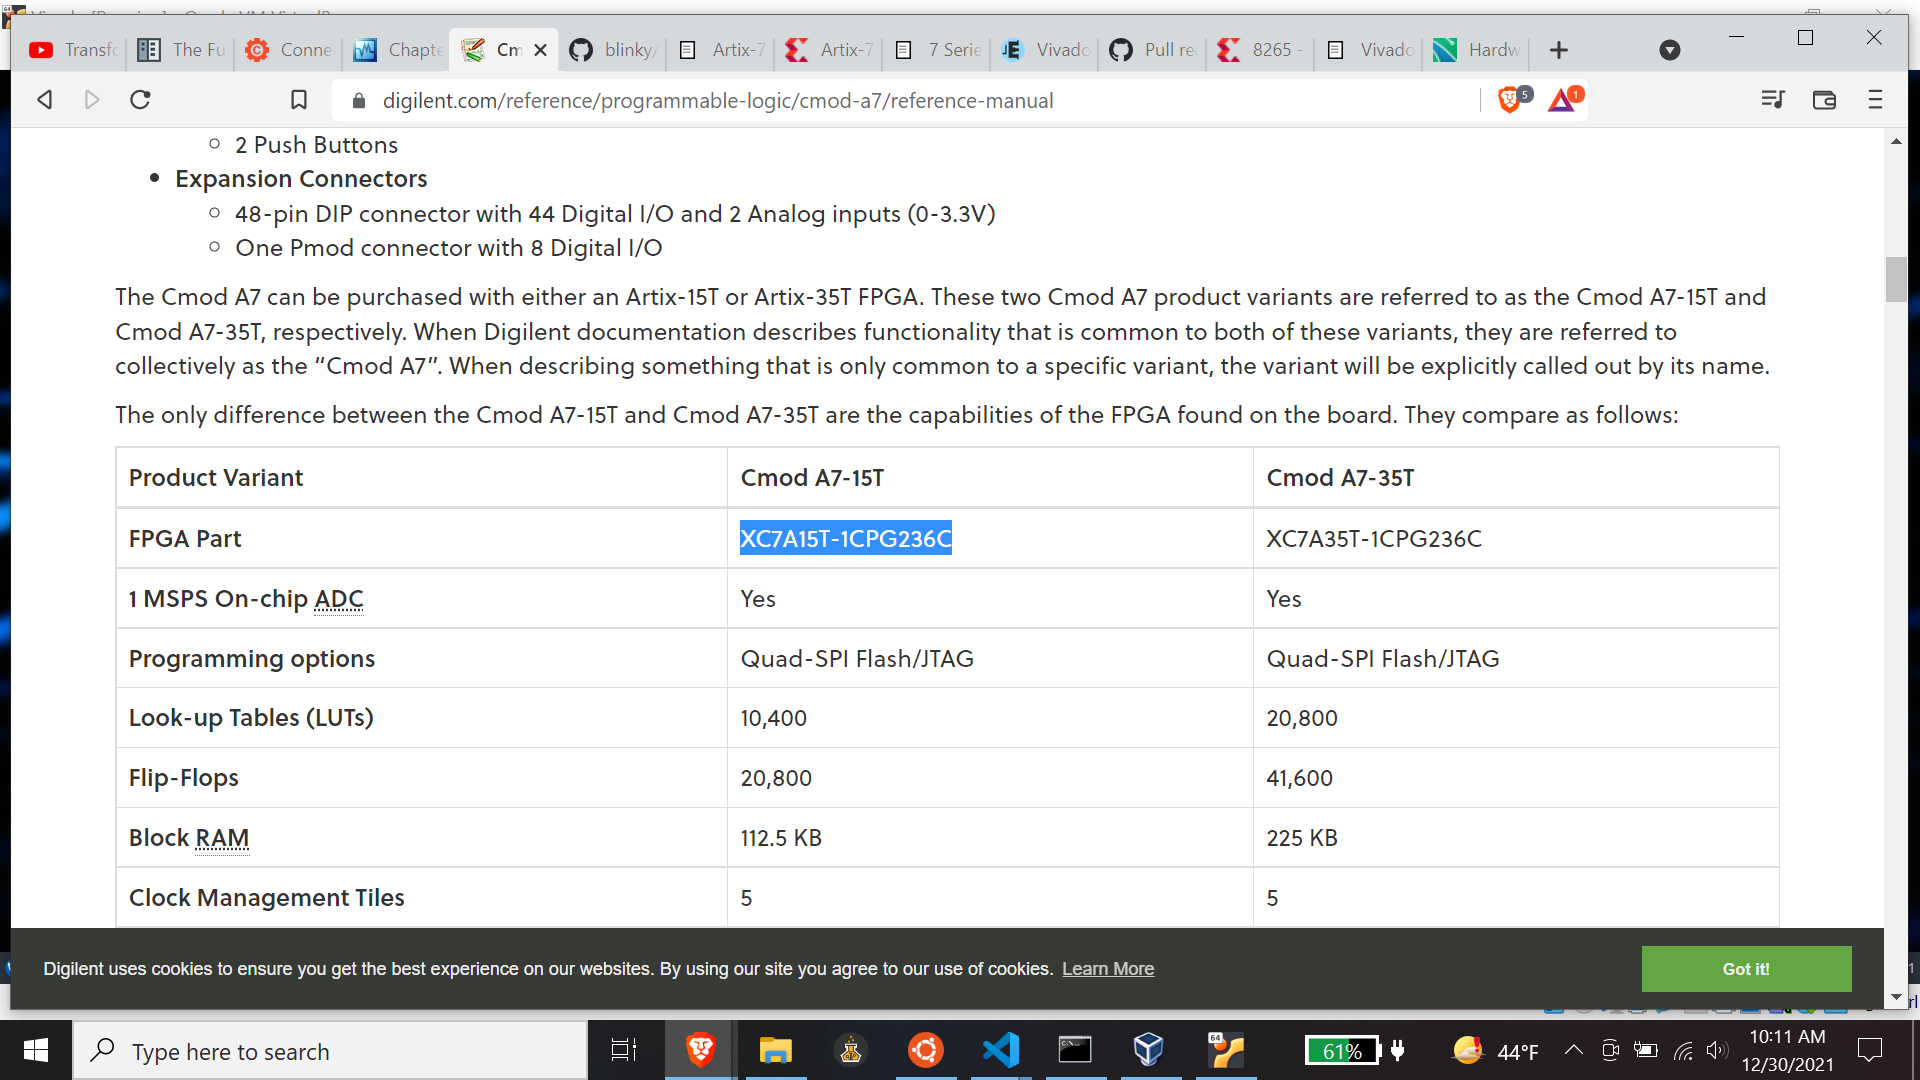
I highlighted Digilent’s identification number fot the 15t. Disecting these numbers a bit more:
XC7A15Tis the Xilinx part number from the Xilinx Artix A7 datasheet.-1is the “speed grade” of the part…-1 being the slower gradeCPG236is the package identifierCis an operating temperature grade identifier…C meaning commercial grade
So I expect the 15t part to be xc7a15tcpg236-1 based on Digilent’s datasheet, and based on the pattern contained within the cmod_a7 package file. Why the different numbering sequences? Who knows…
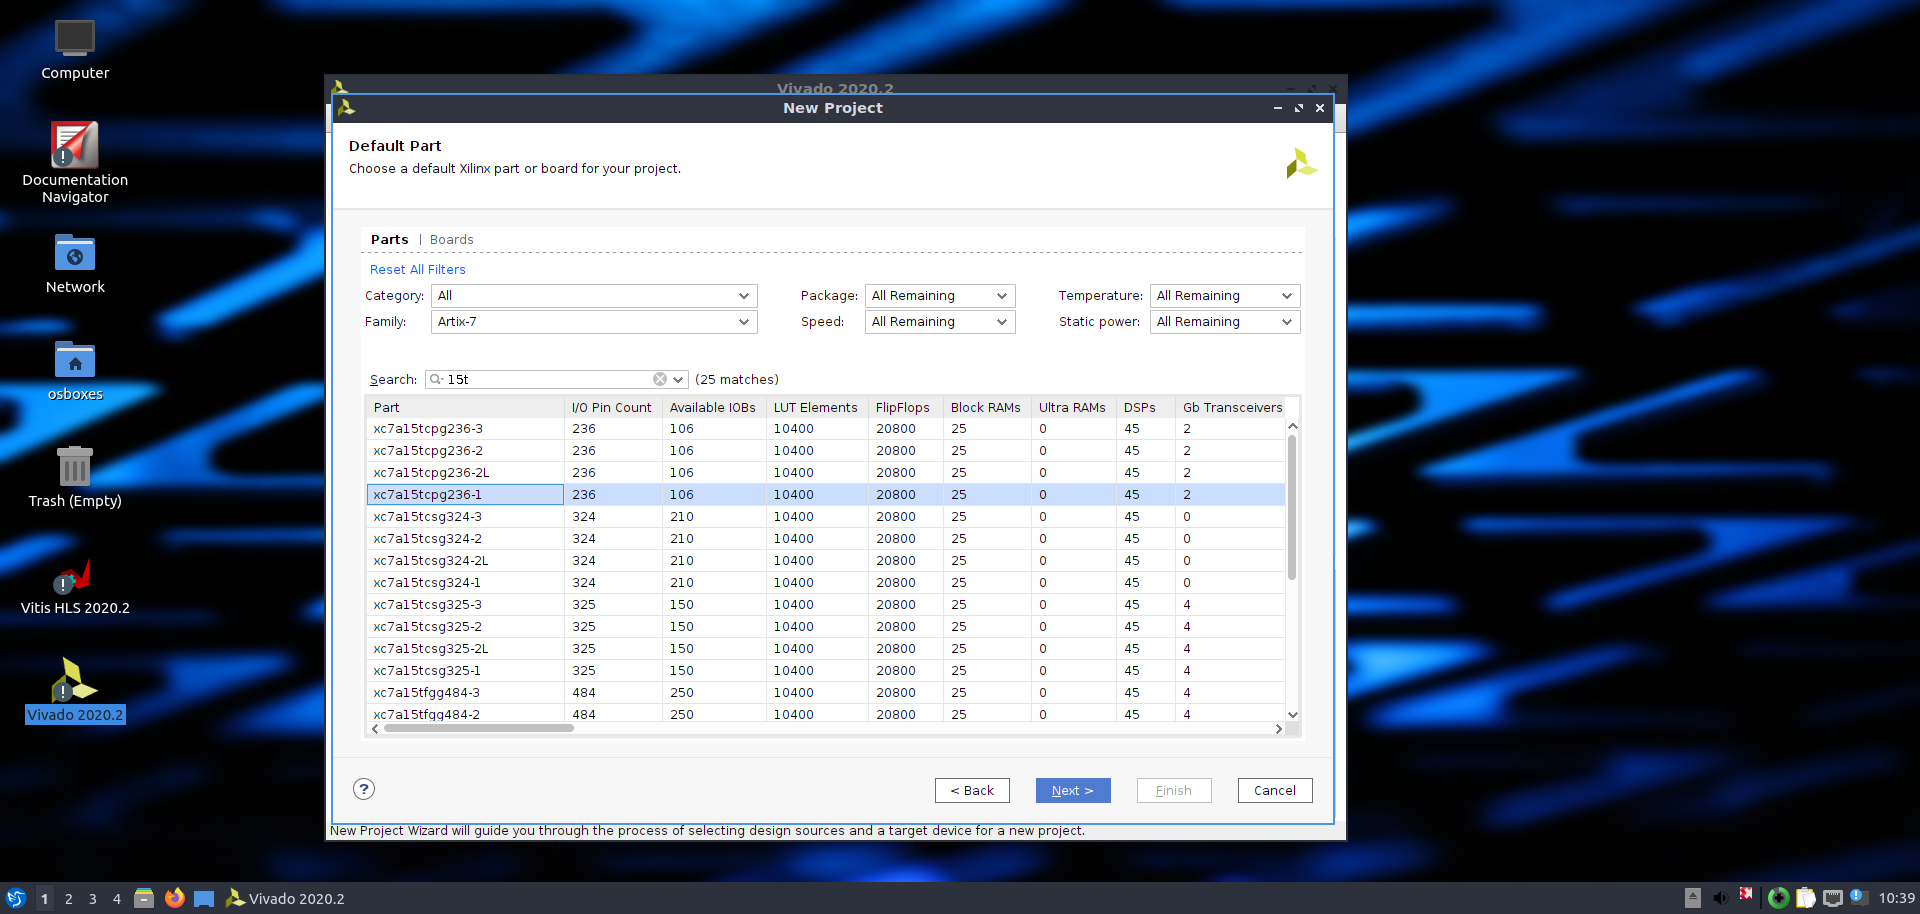
But just to confirm, I opened Vivado and started a new project. When I got to the part screen of the new project wizard, I confirmed that this indeed is a good part number:
Success?
Now what happens when I do”
fusesoc run --target=cmod_a7 fusesoc:utils:blinky --part xc7a15tcpg236-1
Success!!!!!!
Spread the Word
If you found this information helpful, I would appreciate a kind mention.
Click to Tweet (you may edit before posting.)
 XRPTipBot tips appreciated too!